
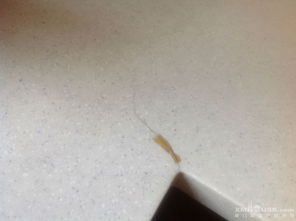
The gleam of artificial marble, with its consistent patterns and durable surface, has made it a beloved choice for countertops, bathroom vanities, and statement pieces in homes and businesses alike. Its ability to mimic the luxurious look of natural stone at a more accessible price point, coupled with its ease of maintenance, makes it a practical yet elegant material. However, even the most resilient materials can bear the marks of time and everyday life. A dropped object, an accidental impact, or even thermal stress can lead to unsightly cracks, marring the flawless finish you so admire. The initial thought might be despair, envisioning costly replacements or professional interventions. But before you resign yourself to a damaged surface, consider this: the art of mending artificial marble is not only achievable but can be a deeply satisfying process, restoring not just the material’s integrity but also its aesthetic appeal.

Understanding the nature of artificial marble is the first step in mastering its repair. Unlike natural marble, which is quarried and formed over millennia, artificial marble is a composite material. It’s typically made from a blend of acrylic polymers, resin binders, and mineral fillers, often including bauxite. This composition gives it its uniformity, non-porous quality, and inherent strength. However, it also means that cracks in artificial marble are fundamentally different from those in natural stone. Instead of cleaving along geological fault lines, artificial marble cracks due to stress exceeding the material’s tensile strength, causing a fracture in the composite matrix. This understanding is crucial because it dictates the repair methodology. The goal isn’t to fill a void with a foreign substance that will later fail; it’s to essentially “weld” the fractured material back together, or to meticulously fill the gap with a substance that bonds seamlessly with the surrounding artificial marble.
The repair process itself can be approached from several angles, ranging from DIY solutions for minor imperfections to more advanced techniques for deeper fissures. For hairline cracks or superficial scratches, a simple polishing compound specifically designed for acrylic or resin-based materials can often work wonders. These compounds contain fine abrasives that gently abrade the surface, leveling out minor imperfections and restoring a uniform sheen. Think of it like buffing out a minor scratch on a car’s paintwork – the aim is to smooth the edges and blend the damaged area with the surrounding pristine surface. For these minor repairs, cleanliness is paramount. Thoroughly cleaning the cracked area removes any debris that could interfere with the polishing compound or be ground into the surface, exacerbating the problem. A soft, lint-free cloth is your best friend here, used with gentle, circular motions.

Moving beyond superficial damage, we encounter cracks that have a more significant width or depth. Here, the challenge escalates, requiring a more deliberate approach to filling the void. The key to a successful repair lies in selecting the right filler material. This isn’t just about finding something that’s the right color; it’s about finding a material that possesses similar physical properties to the artificial marble itself – namely, its ability to bond chemically and to cure into a hard, durable substance that can be polished to a seamless finish. Many DIY repair kits for artificial marble or solid surface materials utilize a two-part epoxy or a specialized acrylic resin. These kits often come with a range of colorants that allow you to custom-mix a shade that precisely matches your existing surface. This color-matching is perhaps the most critical and artful aspect of the repair. A poorly matched color will draw attention to the repair, defeating the purpose. Take your time, test colors on a scrap piece if possible, and err on the side of slightly lighter, as you can always deepen the color with subsequent applications.
Before applying any filler, meticulous preparation of the crack is essential. This involves cleaning the crack itself, not just the surface around it. Compressed air can be incredibly useful for blowing out any dust or loose particles trapped within the fissure. If the crack is particularly stubborn, a fine-tipped tool, like a dental pick or a very fine craft knife, can be used to gently scrape away any dislodged material, ensuring a clean surface for the filler to adhere to. For deeper cracks, a small amount of adhesive promoter or a specialized primer might be recommended by the filler manufacturer to enhance the bond between the artificial marble and the repair material. This step is akin to priming a wall before painting; it creates an optimal surface for adhesion, ensuring the longevity of your repair.
Once the crack is prepared and the filler is mixed to the perfect hue, the application process requires a steady hand and patience. For wider cracks, a small spatula, a putty knife, or even a specialized applicator that comes with the repair kit can be used to carefully press the filler into the void. The goal is to fill the crack completely, ensuring there are no air bubbles trapped within the material. Excess filler will inevitably be squeezed out, and this is perfectly normal. It’s better to slightly overfill than to underfill, as you can always carefully remove the excess once the filler has cured. The curing process is vital. This is where the filler transforms from a liquid or paste into a solid, hardened material. The time required for curing can vary significantly depending on the product used and environmental conditions like temperature and humidity, so it’s crucial to follow the manufacturer’s instructions precisely. Rushing this stage can compromise the strength and integrity of the repair, leading to future issues. Many modern fillers are designed to cure relatively quickly, allowing for a completed repair within a few hours, making it a feasible weekend project.
After the filler has fully cured, the real magic of seamless restoration begins: the finishing. This is where a repair transitions from a visible patch to an almost imperceptible mend. The excess cured filler needs to be carefully removed, and the repaired area needs to be blended back into the surrounding artificial marble. This typically involves a multi-stage sanding process, starting with a coarser grit sandpaper and progressively moving to finer grits. The initial sanding removes the bulk of the excess material, bringing the repaired area down to the level of the original surface. It’s important to be judicious with the pressure applied, especially in the early stages. You’re aiming to level the filler without abrading the original artificial marble more than necessary. A sanding block or a power sander with a fine grit attachment can be helpful, ensuring a flat and even surface.
As you progress to finer grits, the goal shifts from leveling to smoothing. Each subsequent grit of sandpaper refines the surface, gradually eliminating the visible scratches left by the coarser grits. Think of it as a visual and tactile journey from rough to smooth. You’ll notice the surface becoming progressively less hazy and more translucent. Many DIY repair kits include a series of sanding pads or papers, often numbered according to their grit size. It’s essential to follow this progression meticulously. Skipping a grit can leave behind deeper scratches that will be difficult to remove in later stages, potentially requiring you to go back to a coarser grit, thus adding unnecessary work.
The final stages of sanding are where the true artistry comes into play. Using very fine grit sandpaper, typically in the 1000-3000 grit range, you’ll be polishing the repaired area to match the sheen of the surrounding artificial marble. This process might involve wet sanding, where a small amount of water is used to lubricate the sandpaper and wash away any debris. Wet sanding also helps to prevent the sandpaper from clogging, allowing for a smoother finish. As you sand with these finer grits, the repaired area will start to lose its dullness and begin to reflect light more uniformly with the rest of the surface. The objective is to achieve a completely uniform sheen, indistinguishable from the original material. This takes patience and a keen eye. Periodically wipe the surface clean to assess your progress.
Once the sanding is complete, and you’re satisfied with the smoothness and sheen, a final polishing compound or a dedicated artificial marble polish can be applied. This step provides the ultimate finishing touch, bringing out the full luster of the repaired area and ensuring it blends flawlessly with the untouched surfaces. A soft, clean cloth is used to buff the polish in, creating that signature artificial marble gleam. The result should be a surface that not only looks good but feels good to the touch, with no discernible edges or transitions where the repair took place. It’s a testament to your diligence and attention to detail, a small victory over material imperfection.
For more significant damage, such as large cracks or chips that have resulted in missing pieces of material, the process becomes more involved. In these cases, simply filling the void might not be sufficient. You may need to rebuild the missing material. This often involves using a specialized filler that can be built up in layers, or even using a technique called “scarf jointing” for larger cracks where the edges of the break are beveled to create a larger surface area for the adhesive to bond to. For very severe damage, professional restoration services might be the most practical option, as they have access to specialized tools, industrial-grade fillers, and a deep understanding of material science that allows them to tackle even the most challenging repairs. However, for the vast majority of cracks encountered in residential settings, a well-executed DIY repair can yield results that are both beautiful and durable.
The longevity of your repair, and indeed your artificial marble surfaces, also depends on ongoing care. After a repair, it’s wise to be a little more mindful of how you treat the area. Avoid placing extremely hot pans directly on the surface, as thermal shock can be a contributing factor to cracking. Use cutting boards for all chopping and slicing, as sharp objects can scratch and potentially initiate cracks. Regular cleaning with mild, non-abrasive cleaners will help maintain the surface and prevent the buildup of grime that can, over time, dull the finish and make minor imperfections more noticeable. The beauty of artificial marble lies in its sophisticated yet accessible nature, and with a little knowledge and a steady hand, the art of mending its cracks allows you to preserve that beauty, turning potential blemishes into stories of resilience and thoughtful care.


