
The allure of artificial marble lies in its stunning aesthetic, offering the timeless elegance of natural stone with enhanced durability and design flexibility. From sleek kitchen countertops and sophisticated bathroom vanities to chic dining tables and statement feature walls, its versatility makes it a beloved material in modern interiors. However, even the most resilient surfaces can bear the marks of daily life. Scratches from hurried preparations, chips from accidental impacts, or dullness from years of use can detract from its pristine beauty. The good news is that artificial marble, often referred to as solid surface material, is remarkably repairable, allowing you to breathe new life into your cherished surfaces without the need for costly replacements. This guide delves into the nuanced art of artificial marble restoration, empowering you with the knowledge to tackle various forms of damage and maintain its exquisite appearance.
Understanding the nature of artificial marble is the first step in effective repair. Unlike natural marble, which is a porous stone, artificial marble is typically a composite material. The most common types are acrylic solid surfaces (like Corian) and polyester solid surfaces. These materials are engineered to be non-porous, stain-resistant, and seamless, making them hygienic and easy to maintain. Their repairability stems from the fact that the color and pattern often run throughout the entire thickness of the material, meaning that damage to the surface doesn’t necessarily expose a different core material. This is a significant advantage when it comes to cosmetic repairs.
Let’s begin by addressing the most common adversary of any countertop: scratches. Light surface scratches, those that haven’t penetrated deeply into the material, are often the most disheartening because they catch the light and diminish the overall sheen. The good news is that these are usually the easiest to rectify. The key to repairing these is abrasion and then polishing. You’ll typically need a series of fine-grit sandpaper or specialized abrasive pads designed for solid surfaces. Start with a grit that’s slightly finer than what you think you’ll need, perhaps in the 400-600 grit range for very minor scuffs. Gently but firmly sand the scratched area, working in one direction. The goal is to blend the scratched surface with the surrounding area, essentially creating a uniform level of abrasion.
After sanding, you’ll notice the area will look duller and more opaque. This is where the polishing process begins. Progress to progressively finer grits of sandpaper (e.g., 800, 1000, 1500, 2000 grit) or use specialized polishing compounds. Each finer grit removes the microscopic marks left by the previous one, gradually restoring the surface’s luster. It’s crucial to clean the surface thoroughly between grit changes to avoid carrying coarser abrasive particles into the next stage. For a mirror-like finish, a final buffing with a soft cloth and a solid surface polishing compound is often the last step. Some manufacturers offer specific repair kits that include a range of grits and polishing creams, which can be incredibly helpful for beginners. The technique involves a consistent, even pressure and meticulous attention to detail. Don’t rush this process; patience is indeed a virtue when it comes to achieving a seamless blend. For deeper scratches that you can feel with your fingernail, you might need to start with a coarser grit (e.g., 220-320) and work your way up, but always be mindful of how much material you’re removing. It’s better to make multiple light passes than one aggressive one.
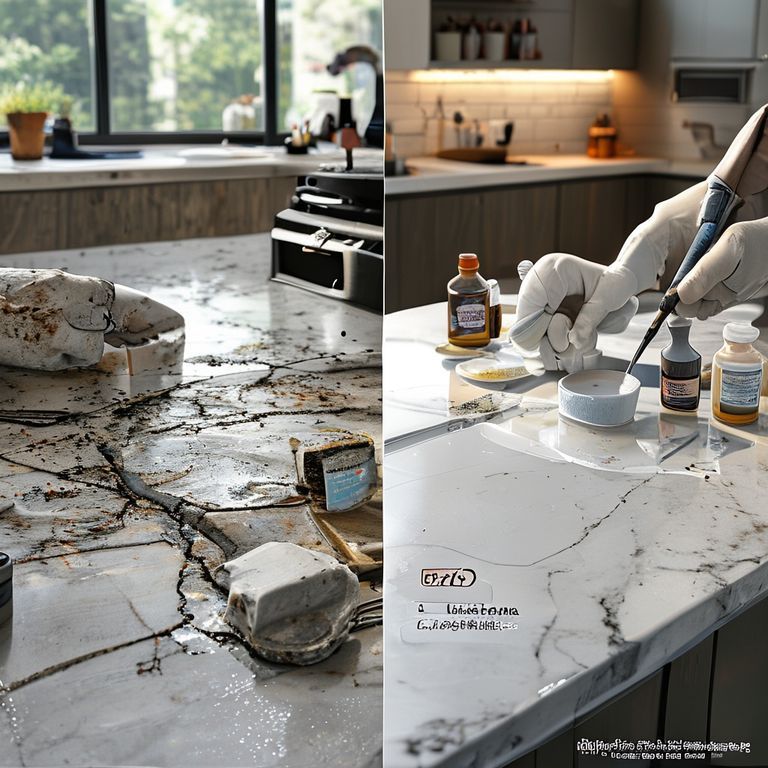
Beyond scratches, chips and deeper gouges present a more significant challenge, requiring a different approach that involves filling and rebuilding the damaged area. For small chips, the repair process often involves using a color-matched acrylic filler or epoxy. The first step is to thoroughly clean the chipped area and ensure it’s completely dry. If there are any loose fragments, they should be carefully removed. Then, using a putty knife or a specialized applicator, carefully fill the chip with the repair material. The key here is to slightly overfill the area, as the material will shrink slightly as it cures. Work the filler in to ensure there are no air bubbles. Once the filler has cured according to the manufacturer’s instructions (this can range from a few hours to a full day), you’ll need to sand it down to the level of the surrounding surface.
This sanding process is similar to scratch repair but requires a bit more precision. Start with a moderately coarse grit sandpaper (e.g., 150-220) to bring the filler down to the surface level. Then, progressively move to finer grits, just as you would with scratch removal, to smooth out the repair and match the finish of the original material. The goal is to make the repaired area indistinguishable from the surrounding surface. If the repair material is a perfect color match, this is achievable. However, if there’s a slight discrepancy, or if you’re working with a patterned artificial marble, color matching can become more complex. Some repair kits offer tintable fillers, allowing you to mix pigments to achieve an exact match. This requires a keen eye for color and a bit of experimentation. For larger chips or deeper gouges, the process is similar but may involve multiple applications of filler to build up the depth, and a more extensive sanding and polishing regimen. In some cases, professional help might be advisable for very substantial damage.
Heat damage, often manifesting as dull, discolored patches or even slight warping, can also occur on artificial marble, particularly around cooktops or where hot pots are placed directly. Repairing heat damage typically involves a more aggressive sanding approach, similar to deep scratch repair. You’ll need to sand away the damaged layer of material. Again, start with a coarser grit sandpaper (around 100-150) to remove the affected material. Progress through the finer grits, ensuring that the entire sanded area is smooth and uniform. The challenge with heat damage is that it can sometimes affect the integrity or appearance of the material more deeply than a simple scratch. If the discoloration is severe or if there’s any sign of material degradation, it might be necessary to consult with a professional. However, for superficial dulling or minor discoloration, a thorough sanding and polishing process can often restore the surface’s original sheen and color. Always remember to use trivets and hot pads to protect your artificial marble surfaces from extreme heat in the future, as prevention is always the best policy.
Continuing our journey into the restoration of artificial marble, let’s explore more intricate repairs and preventative measures that ensure your surfaces remain a source of pride. While scratches, chips, and heat marks are common, cracks can also emerge, especially in areas subjected to significant stress or impact. Repairing cracks in artificial marble is a delicate procedure that requires precision and the right materials to ensure a strong, seamless bond. The most effective method for repairing cracks involves using a specialized acrylic adhesive or a two-part epoxy specifically designed for solid surfaces.
The preparation for crack repair is paramount. Begin by thoroughly cleaning the cracked area to remove any dust, debris, or grease. This ensures optimal adhesion of the repair material. If the crack is not perfectly clean or has any loose edges, you may need to use a fine-bladed knife or a small pick to gently scrape out any impurities. For hairline cracks, the adhesive itself might be sufficient. For wider cracks, you might need to slightly widen the crack with a very fine-bladed saw or a specialized V-groove tool to create a small channel for the adhesive to penetrate and bond effectively. This step should be done with extreme care to avoid further damage.
Once the area is prepped and clean, it’s time to apply the adhesive. Many repair kits come with an applicator or a syringe, allowing for precise application directly into the crack. For color matching, you can often find tintable adhesives or epoxies that allow you to mix in pigments to match your artificial marble. This is where patience and a good eye for color are crucial. Apply the adhesive slowly and steadily, ensuring it fills the entire depth of the crack without excessive overflow. If you’re using a two-part epoxy, ensure you mix the components thoroughly according to the manufacturer’s instructions before application. After application, you may need to apply gentle pressure to the crack to ensure full contact between the adhesive and the material. Sometimes, masking tape can be used to hold the edges of the crack together while the adhesive cures, but be careful not to get tape residue on the surrounding surface.
Once the adhesive has fully cured (refer to the product’s cure time, which can vary significantly), the excess material will need to be carefully sanded down. Similar to chip repair, you’ll start with a moderately coarse grit sandpaper (around 150-220) to level the hardened adhesive with the surface of the artificial marble. From there, you’ll progress through increasingly finer grits (e.g., 320, 400, 600, 800, 1000, 1500, 2000) and polishing compounds to achieve a smooth, seamless finish that perfectly matches the original surface. The goal is for the repaired crack to be virtually invisible. For very significant cracks or those that compromise the structural integrity of the surface, professional intervention is often the most advisable course of action to ensure safety and a lasting repair.
Beyond immediate repairs, maintaining the luster and longevity of your artificial marble surfaces involves a proactive approach to care and cleaning. The non-porous nature of artificial marble makes it inherently stain-resistant, but not entirely impervious. Promptly wiping up spills, especially acidic substances like lemon juice or wine, is always recommended. For daily cleaning, a soft cloth dampened with mild soap and water is usually sufficient. Avoid abrasive cleaners, steel wool, or harsh chemicals like ammonia or bleach, as these can dull the surface or even damage the protective layer over time. If a stronger cleaner is needed for stubborn spots, opt for a specialized solid surface cleaner or a non-abrasive household cleaner. Always test any new cleaning product in an inconspicuous area first.
Regular polishing can also help maintain the showroom-like finish of your artificial marble. A soft cloth and a non-abrasive polish or a wax specifically designed for solid surfaces can be used periodically. This not only enhances the shine but also provides an extra layer of protection against minor scuffs and scratches. Think of it as giving your surfaces a spa treatment – a little effort goes a long way in preserving their beauty. Many homeowners find that incorporating a quick polish once a month keeps their surfaces looking consistently vibrant.
When it comes to preventing damage, vigilance is key. Always use cutting boards when preparing food; never cut directly on your artificial marble countertops. Employ trivets and hot pads under hot cookware to prevent heat damage. Be mindful of heavy or sharp objects that could cause chips or deep scratches if dropped. For areas like kitchen sinks, be cautious with abrasive scrubbing pads, which can dull the finish over time. Instead, use softer cloths or sponges. If your artificial marble is installed in a high-traffic area, consider a protective sealant application, although it’s worth noting that many modern artificial marbles are manufactured with excellent inherent resistance. Always consult the manufacturer’s recommendations for your specific material.
In conclusion, the repair of artificial marble, whether it’s a minor scratch, a stubborn chip, a heat mark, or even a crack, is an achievable endeavor for many homeowners. By understanding the material’s properties and employing the right techniques and materials, you can effectively restore your surfaces to their original splendor. The process often involves a methodical approach of cleaning, filling (if necessary), sanding through progressively finer grits, and polishing. While DIY repairs can be incredibly rewarding and cost-effective, don’t hesitate to seek professional assistance for extensive damage or if you feel uncertain about the process. With proper care and timely attention to any imperfections, your beautiful artificial marble surfaces will continue to enhance your living space for years to come, a testament to the enduring appeal and remarkable resilience of this versatile material.


