
The gleam of artificial marble is often the first thing that draws us to it – that seamless, sophisticated surface that graces our kitchens, bathrooms, and living spaces. It’s a material that whispers elegance and promises durability, a modern marvel that mimics the timeless beauty of its natural counterpart, often at a more accessible price point. Yet, even the most resilient materials aren’t immune to the trials of daily life. A dropped pot, a misplaced knife, the relentless march of time – these can all leave their mark, turning that pristine sheen into a landscape of scratches, dull spots, and even the occasional chip. For many, this signals the end of the line, a disheartening moment where replacement seems the only viable option. But what if I told you that this is far from the truth? What if I told you that artificial marble, much like a phoenix, can rise from its ashes, its beauty and integrity restored with remarkable skill and a touch of scientific wizardry?
The idea of repairing artificial marble might conjure images of clumsy DIY attempts, quick fixes that only serve to highlight the damage, or perhaps even elaborate, costly professional interventions. While these possibilities exist, the reality of artificial marble repair is far more nuanced and, frankly, fascinating. It’s an art form that blends material science with meticulous craftsmanship, a process designed to not just mask imperfections but to truly resurrect the surface, bringing it back to its former glory, and sometimes, even better. Think of it as a spa treatment for your countertops, a rejuvenation that extends their lifespan and preserves their aesthetic appeal.
At its core, artificial marble, also known as cultured marble or engineered stone, is a composite material. It’s typically made from a combination of polyester resin, pigments, and crushed natural stone aggregates, most commonly quartz or granite. This unique composition is what gives it its desirable properties: incredible strength, non-porosity, and a wide array of customizable finishes. However, this very composition also dictates the methods used for repair. Unlike natural stone, which can be porous and prone to staining, artificial marble’s resinous binder offers a different set of challenges and opportunities when it comes to restoration.
One of the most common adversaries of artificial marble is the humble scratch. These silvery lines, born from accidental encounters with sharp objects or abrasive cleaning tools, can seem like permanent scars. The initial instinct might be to simply buff them out. However, the depth and nature of the scratch are crucial. For superficial scratches, often just impacting the top layer of the resin, a fine-grit sandpaper or a specialized polishing compound can work wonders. The process involves carefully abrading the scratched area to the same level as the surrounding material, then progressively using finer grits of abrasive to restore the shine. It’s a delicate dance of removal and refinement, requiring patience and a keen eye to avoid creating a larger, less appealing polished spot. The goal is to blend the repaired area seamlessly into the original surface, making the scratch not just disappear, but become utterly imperceptible.
When scratches are deeper, penetrating beyond the surface layer, a more involved approach is necessary. This is where the resinous component of artificial marble truly shines in repair. The damaged area is carefully cleaned and then filled with a specialized resin filler that closely matches the color and consistency of the original material. This filler is often a two-part epoxy or a similar polymer-based substance. Once applied, it’s allowed to cure, effectively becoming one with the artificial marble. The excess filler is then meticulously ground down and polished to match the surrounding surface. This process requires a skilled hand to ensure the filler is applied evenly, without air bubbles, and that the final polished finish is indistinguishable from the original. It’s a testament to the material’s ability to accept and integrate new material, a characteristic that makes its restoration so effective.
Chips and nicks, those small but jarring imperfections, present a similar repair scenario. The process begins with a thorough cleaning of the damaged area to remove any loose debris. Then, a color-matched epoxy or resin filler is carefully applied to fill the void. The key here is to achieve a flush surface, ensuring the filler doesn’t sit too high or too low. Once cured, the excess is carefully removed through grinding and sanding, followed by a multi-stage polishing process. This often involves progressively finer abrasives, including specialized polishing pads and compounds, to restore the original sheen and clarity. The result is a surface that looks as if the chip never happened, a testament to the precision and skill involved in these repairs.
Beyond physical damage, artificial marble can also lose its luster over time due to wear and tear, chemical exposure from cleaning products, or simply the accumulation of micro-scratches from daily use. This leads to a dull, lackluster appearance that can significantly detract from the overall aesthetic of a space. In such cases, a process of resurfacing or refinishing is employed. This isn’t about filling holes or fixing cracks, but about restoring the entire surface. It typically involves a comprehensive sanding process, starting with coarser grits to remove the damaged top layer and progressively moving to finer grits to achieve a smooth, uniform surface. Following the sanding, the material is polished to a high sheen, often using specialized buffing machines and polishing compounds. This can completely revitalize a worn-out countertop, making it look brand new and restoring its original brilliance. It’s a process that requires a deep understanding of abrasive techniques and polishing, ensuring an even finish without creating localized high-gloss spots or uneven textures. The aim is to strip away the signs of age and wear, revealing the pristine material beneath.
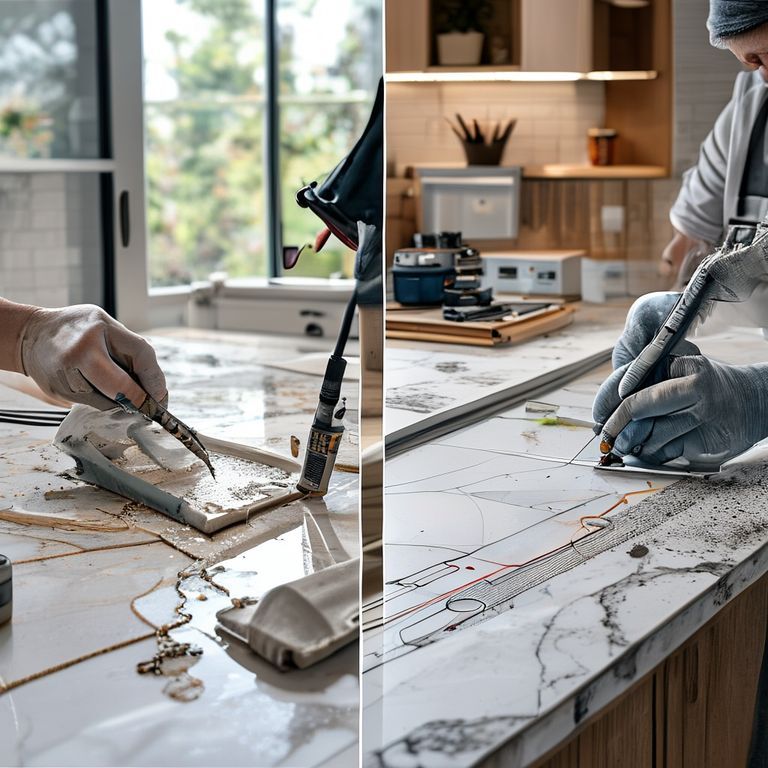
The effectiveness of these repairs lies in the very nature of artificial marble. Its uniform composition and the inherent properties of the resins used mean that it can be sanded, filled, and polished with predictable results. Unlike natural stone, where variations in mineral composition can make repairs more challenging and sometimes unpredictable, artificial marble offers a more controlled environment for restoration. This predictability is what allows skilled technicians to achieve such remarkable results, transforming surfaces that might otherwise be destined for the landfill. The videos that showcase these repairs, often from the perspective of the technician at work, offer a captivating glimpse into this world of material transformation, revealing the intricate steps and the dedication required to bring artificial marble back to its full splendor.
The visual journey of repairing artificial marble is often best understood through the lens of video. These digital narratives, whether instructional DIY guides or professional demonstrations, offer an intimate look into the meticulous processes that breathe new life into tired surfaces. They transcend the limitations of static descriptions, allowing us to witness the transformation unfold, stroke by stroke, polish by polish. The typical video begins by showcasing the problem – the unsightly scratch marring a pristine countertop, the chip that mars the elegant curve of a sink, or the pervasive dullness that has stolen the material’s natural gleam. The initial shots often linger on the imperfections, emphasizing the perceived severity of the damage and setting the stage for the anticipated restoration.
Then, the tools of the trade make their appearance. For superficial scratches, it’s often a simple set of sanding blocks with varying grits of sandpaper, from a coarser 220 grit to ultra-fine finishing grits like 2000 or even 3000. For deeper damage, the repertoire expands to include specialized resin fillers, often a two-part epoxy that must be mixed precisely. There are also various applicators – spatulas, putty knives, and even fine-tipped syringes – used to ensure the filler is applied with accuracy. The professional arsenal includes high-speed polishers with an array of diamond pads and polishing compounds, each designed to achieve a specific level of smoothness and shine. The visual contrast between the dull, damaged surface and the gleaming, restored sections is often stark and incredibly satisfying to observe.
When a video focuses on scratch removal, the process is usually depicted with a calm, deliberate pace. The technician, often wearing protective gear, begins by thoroughly cleaning the scratched area. Then, the sanding commences. It’s not a frantic scrubbing, but a controlled, even application of pressure, working the sandpaper over the scratch. The video might show the scratch gradually fading as the surrounding material is abraded to the same level. Multiple passes with progressively finer grits are crucial, each step removing the marks left by the previous one and gradually restoring the surface’s reflectivity. The close-up shots are key here, allowing viewers to see the subtle changes and the growing smoothness. The final stages often involve a buffing compound, applied with a soft cloth or a polishing wheel, to bring out the full, lustrous shine. The ‘after’ shot is usually presented with dramatic flair, the repaired area blending so seamlessly that the original scratch is impossible to locate.
For chips and larger voids, the video shifts to a more additive approach. After cleaning, the resin filler is mixed. The precision of this mixing is often highlighted, as the color match is paramount. The filler is then carefully applied, ensuring it fills the void completely and creates a slightly raised surface, anticipating the grinding and polishing that will follow. The video might show the filler curing, perhaps with a time-lapse effect, demonstrating the hardening process. The subsequent grinding and sanding stages are critical. Here, power tools come into play, carefully shaving down the excess filler to match the level of the surrounding artificial marble. Again, the progression through finer abrasives is evident, smoothing out the tool marks left by the coarser grits. The final polishing is often the most visually rewarding part, as the repaired area transitions from a matte finish to a mirror-like sheen that perfectly complements the original surface.
Resurfacing or refinishing videos take on a broader scope. The initial shots might encompass the entire countertop or surface, highlighting the overall lack of shine and the presence of numerous micro-scratches. The video then typically shows a methodical sanding process, often starting with a larger floor-based sander for extensive areas, or a handheld polisher for smaller projects. The operator moves with a practiced rhythm, ensuring complete coverage and an even abrasion. As the sanding progresses, the surface can appear hazy or matte, a temporary stage that precedes the revival. The transition to polishing is where the magic happens. The buffing machine, fitted with a felt or foam pad and a specialized polishing compound, spins at high speed, generating heat and friction. The video captures the transformation as the dull haze gives way to a deep, rich shine. The final sweeping shots of the freshly resurfaced material, reflecting light with a dazzling brilliance, serve as a powerful testament to the effectiveness of the technique.
What these videos consistently demonstrate is that successful artificial marble repair is not about magic, but about understanding the material and applying the right techniques with precision and patience. It highlights the importance of using the correct grit sandpaper, the appropriate resin filler, and the right polishing compounds. It also underscores the need for meticulous cleaning at every stage to prevent contamination and ensure a flawless finish. The satisfaction derived from watching these transformations is not just aesthetic; it’s also about the underlying principle of restoration, of giving something a second life, and of recognizing the inherent value in materials that might otherwise be discarded.
The accessibility of these videos has democratized knowledge, empowering homeowners with the confidence to tackle minor repairs themselves. For superficial scratches or small chips, many DIY kits are available, and online tutorials provide step-by-step guidance. However, for more extensive damage, or for those who lack the time or confidence, professional repair services remain invaluable. These videos serve as a powerful advertisement for their expertise, showcasing the skills and tools they employ to achieve professional-grade results. They demystify a process that might otherwise seem daunting, revealing it as a blend of science and artistry, a testament to human ingenuity in preserving and enhancing the materials that enrich our lives. The enduring appeal of artificial marble, now further enhanced by the knowledge that it can be beautifully restored, continues to solidify its place as a favored material in modern design and living.


