The Exquisite Craft of Artificial Stone Countertop Construction: An In-Depth Exploration Part 1
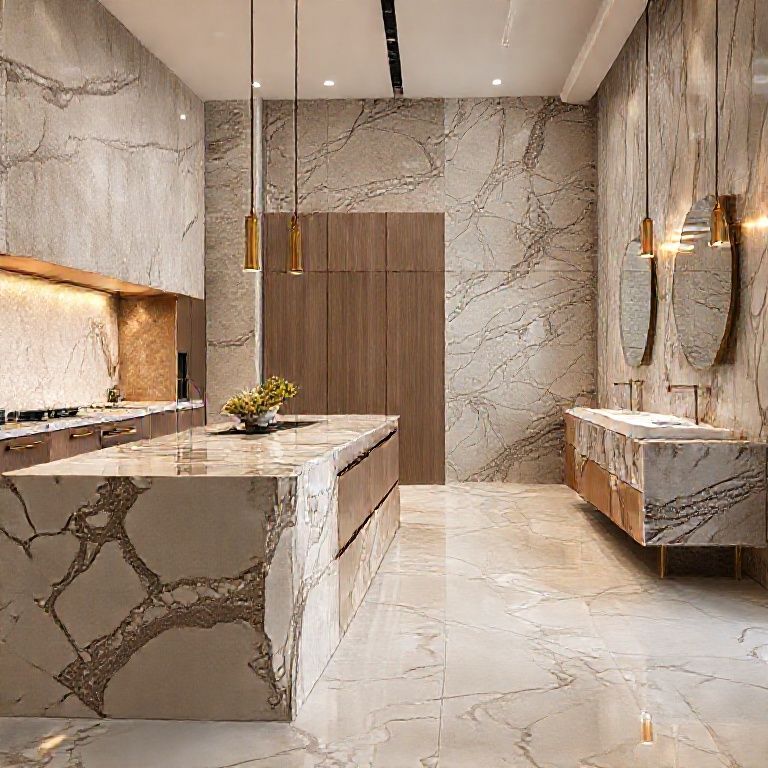
Artificial stone countertops have revolutionized the realm of kitchen and bathroom design, combining the aesthetic appeal of natural stone with unparalleled durability and low maintenance. The installation process of these countertops is a meticulous art that requires a blend of precise craftsmanship and advanced techniques. This part of our detailed exploration will cover the foundational stages of preparation and initial setup, ensuring a robust and beautiful final product.

Material Selection: The Foundation of Excellence
The first step in the installation of artificial stone countertops is the selection of materials. Unlike natural stone, artificial stone is a composite material made from a blend of minerals, resins, and pigments. The choice of the base material is crucial, as it determines the durability, appearance, and maintenance of the countertop.
Key Material Considerations:
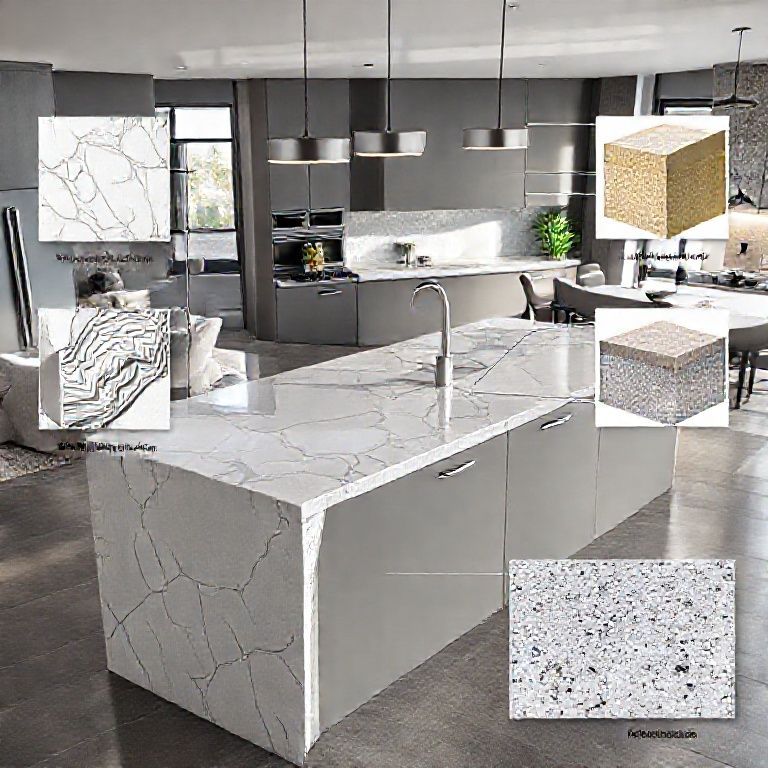
Mineral Content: The primary minerals used are quartz and calcite. Higher mineral content typically leads to greater strength and resistance. Resin Quality: Epoxy and polyester resins are the most commonly used. The quality of the resin affects the countertop’s hardness and resistance to scratching and staining. Color and Design: Artificial stone can be colored and designed in myriad ways, mimicking natural stone or offering unique, bespoke designs. Pre-colored artificial stone is more economical but can be less durable than custom-colored options.
Surface Preparation: Setting the Stage
Proper surface preparation is crucial for ensuring that the artificial stone countertop adheres well and results in a seamless, professional finish.
Surface Preparation Steps:
Cleaning: The surface where the artificial stone will be installed must be thoroughly cleaned to remove any grease, dust, or debris. A high-pressure cleaner or a degreaser can be used for this purpose. Repairing: Any cracks, holes, or uneven areas on the surface need to be repaired before installation. This might involve filling gaps with a suitable filler and smoothing out the area with sandpaper or a similar tool. Drying: The surface must be completely dry before the installation process begins. This can take several hours, depending on the ambient conditions. Priming: Applying a primer to the surface ensures that the adhesive used for the artificial stone adheres properly. The primer also provides a uniform surface for the countertop to bond with.
Initial Setup: Adhesive Application and Placement
The next step involves applying adhesive and placing the artificial stone countertop.
Adhesive Application:
Types of Adhesives: Construction adhesives such as polyurethane or epoxy resin are commonly used. The choice of adhesive depends on the specific requirements of the project and the manufacturer’s recommendations. Application: The adhesive is applied evenly across the surface using a notched trowel. The notches create a key pattern that helps the adhesive spread evenly and ensures a strong bond.
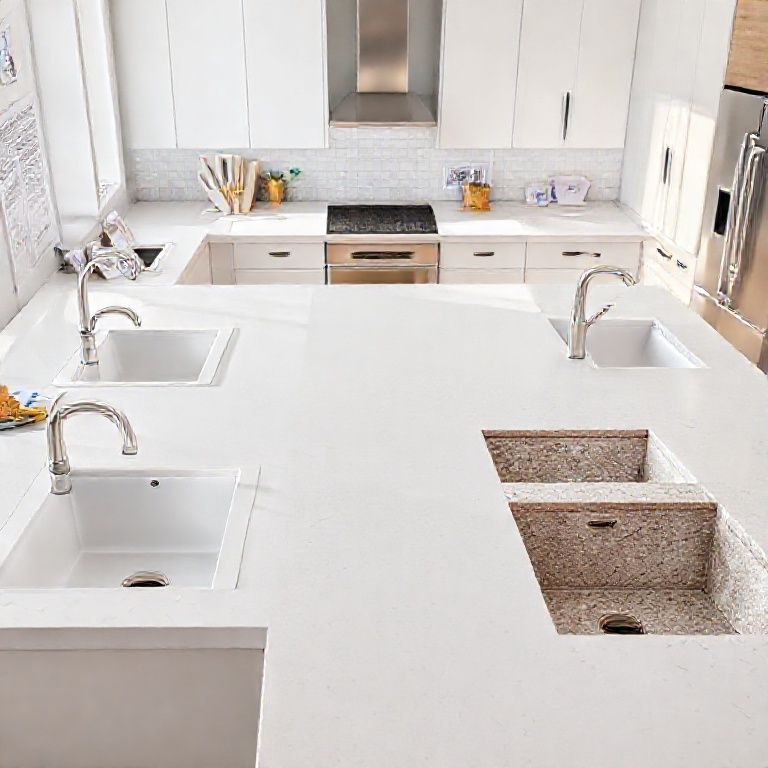
Placement:
Alignment: The countertop is carefully placed on the adhesive, ensuring that it is aligned correctly. This might involve using a laser level or a plumb line to ensure the countertop is perfectly straight. Pressing Down: Once in place, the countertop is pressed down firmly to ensure full contact with the adhesive. A roller or a specialized countertop press can be used for this purpose. Clamping: To ensure the adhesive sets correctly, clamps can be used to hold the countertop in place for several hours. This step is crucial for achieving a strong bond.
Curing and Initial Inspection: Ensuring Longevity
After the countertop has been placed and the adhesive has been allowed to set, the curing process begins.
Curing:
Time Frame: The curing time varies depending on the type of adhesive used and the ambient conditions. Typically, it can take anywhere from 24 to 48 hours for the adhesive to fully cure. Environmental Conditions: The curing process is influenced by temperature and humidity. It is best to follow the manufacturer’s guidelines for optimal curing conditions.
Initial Inspection:
Adhesion: Once the adhesive has cured, the countertop should be inspected for adhesion. Any areas that do not adhere properly should be addressed immediately. Smoothness: The surface should be checked for any bubbles, gaps, or uneven areas. These can be corrected by removing the countertop and reapplying the adhesive in those areas.
Conclusion: Setting the Stage for Part Two
The initial stages of artificial stone countertop installation are crucial for ensuring a durable, aesthetically pleasing result. Proper material selection, meticulous surface preparation, precise adhesive application, and careful curing are all foundational steps that set the stage for the advanced processes that we will explore in part two. As we delve deeper into the craft, we’ll uncover the techniques that bring these countertops to their full, polished potential.
The Exquisite Craft of Artificial Stone Countertop Construction: An In-Depth Exploration Part 2
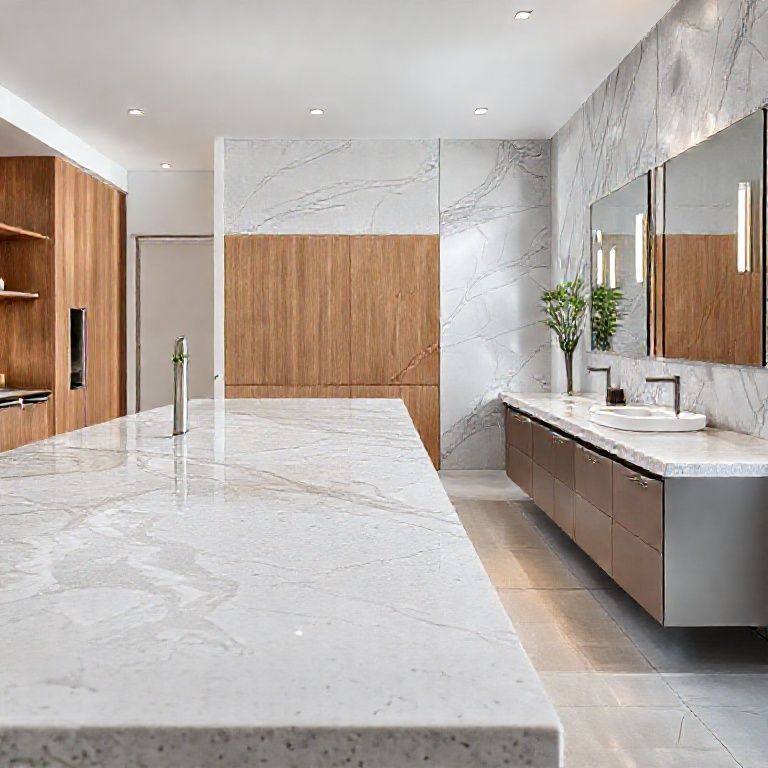
Having covered the foundational stages of artificial stone countertop installation, we now move into the advanced processes that ensure these surfaces not only look stunning but also offer exceptional durability and low maintenance. This part will explore the intricate details of cutting, shaping, sealing, and polishing, culminating in a polished, professional finish.
Cutting and Shaping: Precision at Every Angle
The process of cutting and shaping artificial stone countertops is where the craftsmanship truly shines. Precision is key to ensuring that the countertop fits perfectly and meets the aesthetic requirements of the space.
Cutting Techniques:
Manual Cutting: For smaller projects, a handheld diamond saw can be used to make precise cuts. This method requires skill and experience to achieve clean, straight edges. Automated Cutting: For larger projects or when consistent, high-quality cuts are required, automated cutting machines are employed. These machines use diamond blades to make precise cuts with minimal waste.
Shaping:
Edge Shaping: The edges of the countertop are shaped to match the contours of the surrounding cabinetry or other surfaces. This might involve using specialized tools like edge trimmers or grinders. Custom Shapes: For bespoke designs, the countertop can be cut into custom shapes. This requires careful planning and often the use of CAD software to design the desired shape before cutting.
Sealing: Protecting the Beauty and Durability
Sealing the artificial stone countertop is a critical step in protecting its surface and ensuring longevity.
Sealing Process:
Surface Cleaning: Before sealing, the surface must be cleaned thoroughly to remove any dust, debris, or residue. A high-pressure cleaner or a specialized cleaner can be used. Sealant Application: A high-quality sealant is applied to the surface using a roller or a brush. The sealant protects against stains, scratches, and spills. Curing: The sealant must cure properly to ensure maximum protection. This process can take several hours and is influenced by temperature and humidity.
Types of Sealants:
Silicone-Based Sealants: These provide excellent protection against water and stains. They are ideal for kitchen and bathroom countertops. Polyurethane Sealants: These offer superior resistance to scratches and chemical spills. They are often used for high-traffic areas.
Polishing: The Final Touch of Shine
Polishing the artificial stone countertop is the final step that brings out its full beauty and ensures a smooth, professional finish.
Polishing Techniques:
Manual Polishing: For smaller areas or intricate designs, a hand polisher with a diamond polishing pad can be used. This method requires skill to achieve an even, glossy finish. Machine Polishing: For larger surfaces, a polishing machine with a diamond pad is used. This ensures a consistent, high-gloss finish.
Polishing Steps:
Pre-Polishing: Any imperfections or rough areas are addressed before polishing. This might involve using a grinder or a sanding block. Polishing: The surface is polished in stages, starting with a coarse polish and gradually moving to a finer polish. This ensures a smooth, shiny finish. Final Inspection: The polished surface is inspected for any areas that require additional polishing. This ensures a flawless, professional finish.
Finishing Touches: Ensuring Longevity and Aesthetic Appeal
The final stages of artificial stone countertop installation involve adding any necessary finishing touches to ensure the longevity and aesthetic appeal of the surface.
Finishing Touches:
Edge Treatment: The edges of the countertop are often treated to prevent chipping and to enhance the overall look. This might involve using an edge cap or a specialized sealant. Color Matching: If the countertop is part of a larger design, it may be necessary to match the color to surrounding surfaces. This can be achieved through precise cutting and blending techniques. Maintenance Plan: A maintenance plan is provided to ensure the countertop continues to look its best. This includes guidelines for cleaning, sealing, and repairing the surface.
Conclusion: Mastering the Craft
The installation of artificial stone countertops is a meticulous process that combines precise craftsmanship with advanced techniques. From material selection to cutting, sealing, and polishing, each step is crucial to achieving a beautiful, durable surface. By mastering these processes, installers can create countertops that not only enhance the aesthetic appeal of当然,继续探讨一下人造石台面的施工工艺流程,我们可以深入了解其他一些重要的细节和注意事项,以确保最终产品的质量和耐用性。
安装前的准备工作
在正式开始安装之前,需要进行一些准备工作,这些步骤有助于确保安装过程顺利进行,并最终得到理想的效果。
测量和裁剪: 测量空间:详细测量安装空间的尺寸,确保人造石台面能够完美契合设计需求。 裁剪台面:根据测量结果,用钢尺和铅笔标记裁剪线,并使用切割工具(如钻孔机或切割机)裁剪台面。裁剪时需要特别注意精度,以确保台面能够完美契合设计。 安装前检查: 检查材料:在安装前,检查人造石台面和其他安装材料的质量,确保没有任何裂纹、凹陷或其他缺陷。
工具和设备:确保所有工具和设备(如切割机、胶枪、压力机等)都在良好状态,以便在安装过程中使用。
安装过程
安装人造石台面的过程中,需要特别注意每个步骤的精确性,以确保台面的牢固性和美观度。
表面处理: 清洁表面:在安装前,对台面底部和周围的表面进行彻底清洁,确保没有油污、灰尘或其他杂质。 打磨表面:如果底部表面不够平整,可以使用砂纸或打磨机进行打磨,以确保台面能够牢固地贴合底部。 粘合剂涂抹: 粘合剂选择:选择适合人造石台面的粘合剂,并按照说明进行调配。
常用的粘合剂包括聚氯乙烯胶、聚氯乙烯树脂等。 均匀涂抹:用胶枪或胶抹刀将粘合剂均匀地涂抹在台面底部或台面底面(具体取决于设计要求),确保覆盖整个接触面。 台面安装: 固定台面:将人造石台面小心地放置在粘合剂上,确保其与底部表面完全对齐。使用夹具或压板固定台面,以保持其在粘合剂干燥前的位置。
保持压力:根据粘合剂的干燥时间,保持台面在压力下,以确保粘合剂充分干燥并形成牢固的连接。
后续处理
安装完成后,需要进行一些后续处理,以确保人造石台面的美观和耐用性。
边缘处理: 封边:对台面的边缘进行封边处理,可以使用专用的封边胶或密封剂,以防止水分进入缝隙并影响粘合效果。 打磨和抛光:对台面进行打磨和抛光处理,以去除多余的粘合剂和确保表面光滑平整。 清洁和保养: 清洁台面:安装完成后,对台面进行清洁,确保没有粘合剂残留或其他杂质。
可以使用中性清洁剂和软布进行清洁。 定期保养:为了确保人造石台面的长期美观和耐用,定期进行清洁和保养,使用专用的保养剂进行抛光和保护。
常见问题及解决方法
通过以上详细的步骤和注意事项,可以确保人造石台面的安装质量,使其具有长久的美观和耐用性。