Part 1
The Ultimate Guide to Kitchen Countertop Replacement: When to Smash the Old One and What to Expect
When it comes to kitchen renovations, one of the most transformative projects you can undertake is replacing your kitchen countertops. Whether your old countertops are worn, outdated, or simply don’t match your vision for the new kitchen, a fresh set of countertops can breathe new life into your space. But the question many homeowners ask is: “Do I need to smash the old countertop?” Let’s dive deep into this crucial aspect of kitchen countertop replacement to help you make an informed decision.

Understanding the Importance of Kitchen Countertops
Kitchen countertops are not just functional surfaces; they are the heart of your kitchen. They are where you prepare meals, conduct daily activities, and often entertain guests. Given their central role, having high-quality, aesthetically pleasing countertops can significantly enhance your kitchen’s overall look and feel.
Assessing Your Old Countertop
Before you decide whether to smash your old countertop, it’s important to assess its condition. Here are some key factors to consider:
1. Condition of the Surface
Damage and Wear: If your old countertop is heavily damaged or worn, it may not be salvageable. Chips, cracks, or deep scratches can make it challenging to repair, and the aesthetic appeal will be compromised. Material: Different materials have different fates. For instance, granite or quartz countertops can often be resurfaced if they are in good structural condition. However, materials like laminate or Formica are usually more disposable.

2. Structural Integrity
Substrate Quality: The underlying substrate is crucial. If the substrate is intact but the surface is damaged, resurfacing may be an option. However, if the substrate is compromised, it’s often best to replace the entire countertop. Warping and Warping: If your old countertop has warped or is uneven, it’s best to replace it entirely.
3. Aesthetic Appeal
Outdated Style: If your old countertop is simply outdated, it’s often easier and more effective to replace it with a new one that matches your current design aesthetic.
Should You Smash Your Old Countertop?
The decision to smash your old countertop largely depends on the condition and type of material. Here are some scenarios to consider:

1. When to Smash
Totally Unsalvageable: If the old countertop is completely beyond repair, it’s best to smash it. This is often the case with laminates, composites, and other materials that do not respond well to resurfacing. Safety Concerns: If the countertop poses any safety hazards, such as sharp cracks or edges, it should be smashed and disposed of properly.
2. When to Resurface
High-Quality Granite or Quartz: If your old countertop is made from high-quality stone, consider resurfacing. This process involves removing the surface layer and applying a new one, which can significantly extend the life of the countertop. Minor Damage: For minor scratches or stains, a professional refinishing service might be able to restore its look without the need to replace it entirely.
3. When to Remove Carefully
Preservation: In some cases, if the old countertop has sentimental value or is made from a unique material, you might want to remove it carefully. This can be done by a professional who will ensure it’s disposed of properly without causing damage.

The Process of Replacing Kitchen Countertops
Replacing kitchen countertops involves several steps, from planning to installation. Here’s a breakdown of what to expect:
1. Planning and Design
Choose Your Style: Decide on the style, color, and material that best fits your kitchen design and budget. Measure: Accurately measure your countertop space to ensure a proper fit. Don’t forget to account for the thickness of the new countertop.
2. Removal of Old Countertop
Professional Help: It’s often best to hire a professional to remove the old countertop. They will have the necessary tools and expertise to do it safely and efficiently. Disposal: Proper disposal of the old countertop is crucial. Check local regulations for disposal of different materials.
3. Preparing the Surface
Cleaning: Clean the surface thoroughly to remove any grease, grime, or old adhesive. Repairing: Fix any underlying issues like warping or damage to the substrate.
4. Installation of New Countertop
Measurement and Cutting: The new countertop will need to be measured and cut to fit your space precisely. Adhesion: Depending on the material, the countertop may be adhered to the substrate using specialized adhesives or secured with clips. Sealing: For stone countertops, sealing is crucial to protect against stains and spills.
5. Finishing Touches
Edge Finishing: Ensure all edges are smooth and secure. Cabling and Fixtures: Reinstall any necessary cabling or fixtures.
What to Expect After Installation
Once your new countertop is installed, there are a few things to keep in mind:
1. Break-In Period
Initial Use: Allow a break-in period for the new countertop. This can vary depending on the material, but generally, it’s best to avoid heavy use for the first few weeks. Cleaning: Follow the manufacturer’s instructions for cleaning and maintenance to ensure longevity.
2. Maintenance
Regular Cleaning: Regular cleaning will keep your countertop looking new. Use appropriate cleaning products for the material. Repairs: Be mindful of potential damage and repair any scratches or chips promptly.
3. Long-Term Benefits
Aesthetic Appeal: Enjoy the refreshed look and feel of your kitchen. Functionality: Enhanced functionality with a new, high-quality surface.
Part 2
The Ultimate Guide to Kitchen Countertop Replacement: When to Smash the Old One and What to Expect
Continuing our exploration of kitchen countertop replacement, this second part delves deeper into the specifics of the process, including preparation, installation, and the long-term benefits of a new countertop.
Detailed Preparations Before Replacement
Preparation is key to a successful countertop replacement. Here’s what you need to do before starting the project:
1. Budgeting
Total Cost: Factor in the cost of the new countertop material, installation, and any additional features like backsplash or under-cabinet lighting. Contingency: Always set aside a contingency fund for unexpected expenses.
2. Design and Style
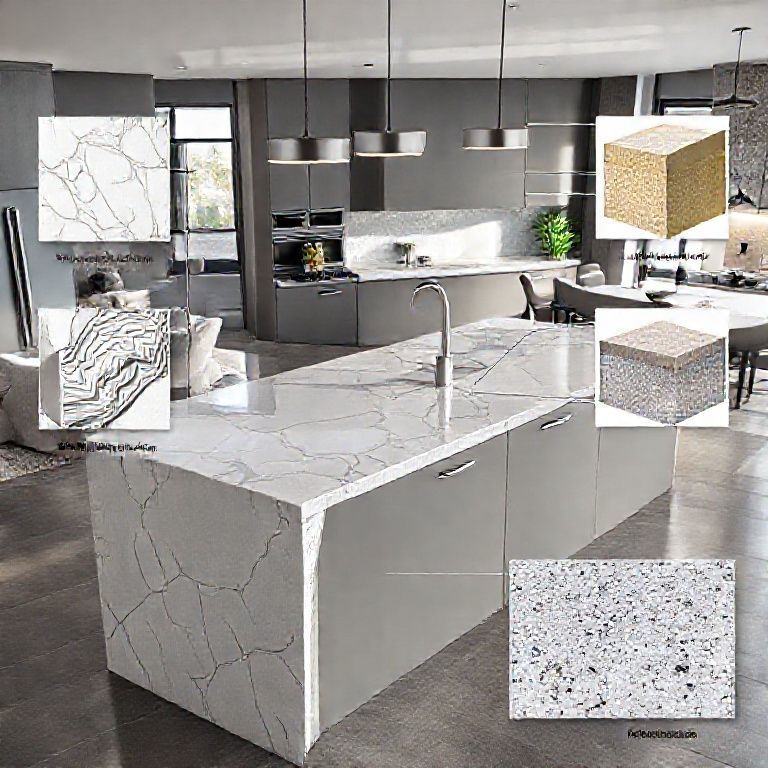
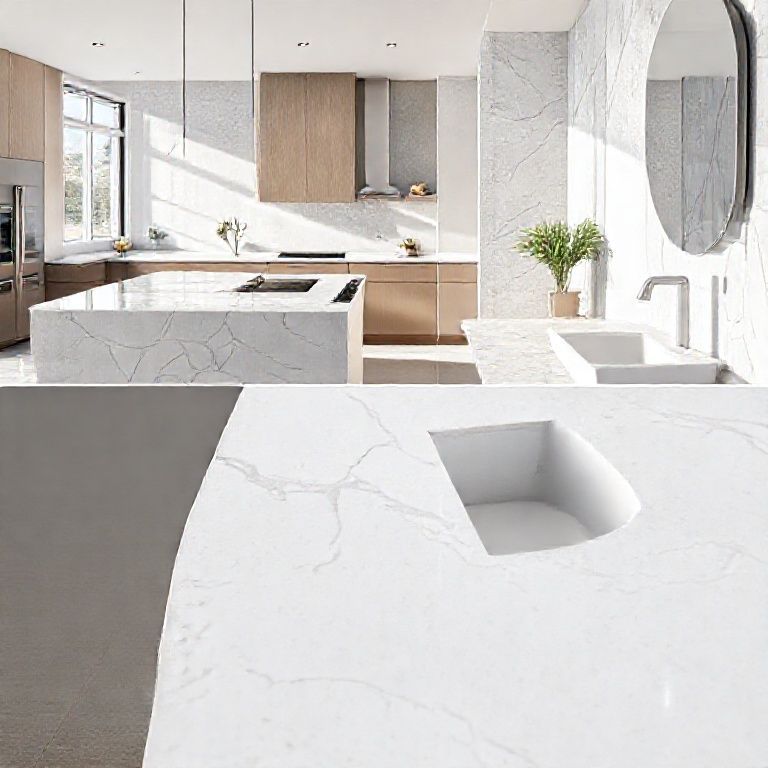
Color and Finish: Decide on the color, finish, and style that will complement your kitchen decor. Consider factors like durability, maintenance, and aesthetic appeal. Material Selection: Choose a material that fits your budget and lifestyle needs. Popular options include granite, quartz, stainless steel, and composite.
3. Professional Consultation
Consultation: Schedule consultations with countertop suppliers and installers to discuss your options and get estimates. This will help you make an informed decision.
Step-by-Step Removal of Old Countertop
Removing the old countertop is a critical step that requires careful attention to detail. Here’s a detailed guide:
1. Safety First
Protective Gear: Wear protective gear such as gloves, goggles, and a dust mask. Tools Required: Gather necessary tools including a pry bar, hammer, utility knife, and protective padding.
2. Disassembling Fixtures
Appliances: If your countertop extends over appliances, unplug them and remove any mounting hardware. Hardware Removal: Remove any hardware like clamps, clips, or adhesive fasteners that are holding the countertop in place.
3. Carefully Lifting and Removing
Lifting: Use a pry bar to lift the countertop carefully. Avoid sudden, forceful movements that could damage the underlying substrate. Dispose of: Dispose of the old countertop properly. Check local regulations for disposal methods, especially for hazardous materials.
Installation of New Countertop: A Detailed Guide
Installing a new countertop is a meticulous process that requires precision. Here’s a step-by-step guide to ensure a smooth installation:
1. Measuring and Cutting
Accurate Measurements: Measure the countertop space accurately to ensure a perfect fit. Cutting: Use a tile saw or countertop cutter to cut the new countertop to size. Make sure to account for thickness and any specific measurements required by the installation method.
2. Preparing the Substrate
Cleaning: Clean the substrate thoroughly to remove any grease, dust, or debris. Repairing: Fix any structural issues like warping, cracks, or holes in the substrate.
3. Adhesion and Installation
Adhesives: Use high-quality adhesives for installation. Follow the manufacturer’s instructions for mixing and application. Securing: Secure the继续安装新的厨房台面,我们将详细介绍具体的安装步骤,以及一些常见的注意事项。
3. 安装新台面
3.1 固定新台面
石材台面: 黏合和固定: 在台面底部均匀涂抹高质量的粘合剂,然后将台面小心地放置在预先准备好的位置。用橡皮垫或类似物品保护地板,以防止台面移动。 压实: 用沉重的物体(如水桶或沉重的桌子)在台面上压实,确保其与底部紧密贴合,通常需要几个小时。
等待干燥: 等待粘合剂完全干燥,这通常需要24小时。 复合台面: 夹紧和固定: 复合台面通常使用特殊的夹具来固定。将夹具放置在台面周围,然后将台面放置在准备好的位置。 固定: 使用钳子或夹具将台面压紧,并确保其牢固地固定在底部。 等待固化: 等待夹具固化时间,通常需要24小时。
不锈钢台面: 安装螺丝: 在底部预先打孔,然后使用螺丝将台面固定到底部。 调整和紧固: 调整台面的位置,确保其水平,然后将螺丝拧紧。
3.2 安装边缘和接缝
密封: 对于石材和复合台面,需要在接缝处使用密封剂来防止溢出和污渍。使用密封剂后,需要等待几小时或者一天,根据说明书的要求,确保密封剂完全固化。 边缘处理: 对于不锈钢台面,边缘通常需要使用专门的边缘保护条来防止刮伤和磨损。
3.3 清洁和保护
初次清洁: 安装完成后,使用中性清洁剂轻轻擦拭台面,以去除任何残留的粘合剂或安装过程中产生的灰尘。 保护涂层: 根据台面材料的不同,可能需要涂抹保护涂层或抛光剂。例如,石材台面通常需要定期涂抹石材抛光剂来保持光泽和防止污渍。
4. 长期维护
为了保持新台面的美观和功能,需要进行定期的维护:
清洁: 根据材料的不同,使用适当的清洁剂和清洁方法。例如,石材台面不建议使用强酸或强碱清洁剂,而不锈钢台面则可以使用普通的中性清洁剂。 避免刮擦: 避免在台面上放置尖锐物品,以防止刮擦和划伤。使用砧板或台面保护垫。 定期保护: 定期涂抹保护涂层或抛光剂,以保持台面的光泽和防护功能。
5. 常见问题与解决方案
台面不平整: 如果台面不平整,可以使用台面调整器或重新固定台面。 污渍和划痕: 根据材料不同,采用适当的清洁和修复方法。例如,石材台面可以使用专门的修复剂来处理划痕和污渍。 密封剂脱落: 如果密封剂脱落,需要重新涂抹并等待其完全干燥。
通过以上步骤,您可以成功地更换厨房台面,并确保其长期美观和耐用。希望这些信息能帮助到您,如果有其他问题,欢迎继续提问!