Planning and Preparation
${part1}
When it comes to kitchen countertop replacement, many people are initially concerned about the hassle and potential disruption it might cause. However, with the right preparation and understanding of the process, you can ensure a smooth and successful transformation for your kitchen. Let’s delve into the initial stages of planning and preparation that are crucial for a successful countertop replacement.
Understanding Your Needs
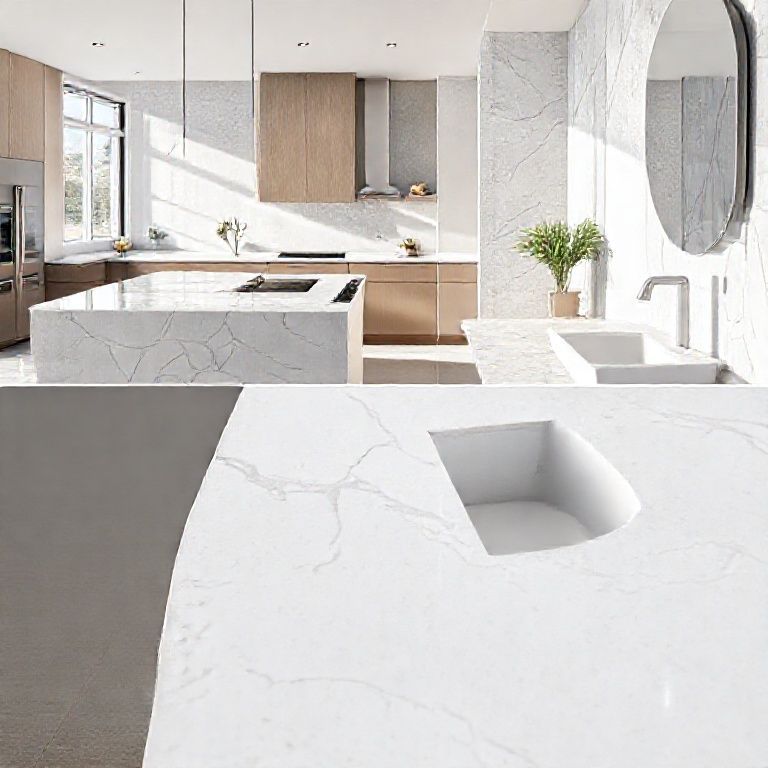
The first step in replacing your kitchen countertops is to understand your specific needs and desires. Consider what type of countertop material would best suit your kitchen’s aesthetic and functionality. Popular options include granite, quartz, marble, and composite materials. Each has its unique benefits and drawbacks in terms of durability, maintenance, and cost.
For instance, granite is known for its durability and natural beauty but requires sealing to prevent staining. On the other hand, quartz offers a low-maintenance alternative with a wide range of colors and patterns, making it a versatile choice for modern kitchens. Understanding your preferences and lifestyle will help you make an informed decision.
Budgeting
Next, you’ll need to establish a budget. Kitchen countertop replacement can vary significantly in cost depending on the material, complexity of design, and labor costs. It’s essential to have a clear idea of how much you are willing to spend. Generally, expect to pay between $5 to $15 per square foot for installation, with material costs adding another layer to the expense.

Make sure to factor in any additional costs such as custom cuts, disposal fees for old countertops, and potential delays in kitchen use during the renovation. Keeping a well-defined budget will help avoid any unexpected expenses down the line.
Choosing a Contractor or DIY
Deciding whether to hire a professional contractor or tackle the project yourself is another critical consideration. Professionals bring expertise and can ensure a high-quality finish, but they come with higher costs. Conversely, DIY enthusiasts might find satisfaction in handling the project themselves, potentially saving on labor fees but requiring a good understanding of tools and techniques.
If you opt for a professional, ensure they are reputable and have experience with the specific type of countertop you’ve chosen. A contractor can also provide valuable advice on the best practices for installation and maintenance.

Design and Layout
Once you’ve made decisions about material, budget, and whether to hire a professional, it’s time to focus on design and layout. Work with your contractor or design software to visualize how the new countertops will look in your kitchen. Consider the flow of your kitchen and how the new countertops will integrate with existing elements like cabinets, sinks, and appliances.
If you’re going the DIY route, take detailed measurements of your current space and sketch out your design. Pay attention to the edges and corners where the new countertop will meet other surfaces. A well-thought-out design will ensure a seamless look and prevent future issues.
Permits and Regulations
Depending on your local regulations, you may need to obtain permits for kitchen renovations. Check with your local building department to see if a permit is required for your countertop replacement project. While countertops generally fall under minor renovations, it’s always better to be safe and ensure you comply with all necessary regulations.

Conclusion
Replacing kitchen countertops can indeed seem like a daunting task, but with careful planning and preparation, the process becomes much more manageable. By understanding your needs, budgeting appropriately, choosing between a professional or DIY approach, and focusing on design and layout, you set a solid foundation for a successful and beautiful kitchen transformation. Stay tuned for the next part, where we’ll explore the installation process and common challenges you might encounter.
Installation and Final Touches
${part2}
Now that you have completed the planning and preparation stages, it’s time to move on to the exciting part—installation. Replacing kitchen countertops is an intricate process that requires careful execution, but with the right guidance, you can ensure a seamless and professional finish. Here’s a detailed look at what to expect during installation and the common challenges you might face.
Installation Process
1. Removing the Old Countertop
The first step in the installation process is removing the old countertop. This task can vary depending on whether your old countertop is glued or fastened with clips. If it’s glued, you’ll need to carefully pry it off using a pry bar and a hammer. If it’s fastened with clips, you’ll need to detach these carefully to avoid damaging the cabinets underneath.
Regardless of the method, it’s important to remove all remnants of the old countertop, including adhesive and backing material. This ensures a clean surface for the new countertop installation. Depending on the size of your kitchen, this process can take a few hours to a full day.
2. Preparing the Surface
Once the old countertop is removed, the next step is to prepare the surface. This involves cleaning the area thoroughly to remove any grease, dirt, or debris. For best results, use a degreasing cleaner and a stiff-bristled brush to scrub the surface.
After cleaning, inspect the area for any damage or imperfections. Repair any cracks or holes in the cabinets and ensure the surface is level and smooth. A level surface is crucial for a proper fit and to avoid any uneven edges on the new countertop.
3. Measuring and Cutting the New Countertop
With a clean and prepared surface, it’s time to measure and cut the new countertop. If you’re working with a material like granite or quartz, precise measurements are essential. Use a tape measure to determine the exact size needed, and if necessary, use a wet saw to cut the countertop to fit your space perfectly.
Make sure to account for any custom cuts around sinks, cabinets, and appliances. Taking the time to measure accurately will save you from having to make multiple adjustments later on.
4. Installation
Installation typically involves securing the new countertop to the cabinets. For glued installations, apply a high-quality countertop adhesive to the back of the countertop and press it into place, ensuring it’s level and straight. Use shims to hold the countertop in place while the adhesive cures.
If your countertop is fastened with clips or brackets, carefully attach these according to the manufacturer’s instructions. Ensure that the countertop is securely fastened and level throughout.
5. Finishing Touches
Once the countertop is securely in place, it’s time for the finishing touches. This includes trimming any excess material around the edges, applying sealant if necessary, and cleaning the surface to remove any dust or residue from the installation process.
For natural stone countertops like granite or marble, you’ll need to seal the surface to protect it from stains and spills. Follow the manufacturer’s instructions for applying the sealant, and make sure to clean the countertop thoroughly before sealing to ensure maximum protection.
Common Challenges and Solutions
1. Leveling the Countertop
One of the most common challenges during installation is ensuring the countertop is level. An uneven countertop can look unsightly and may even pose functional issues, such as difficulty opening cabinet doors.
To address this, use a level frequently to check the height of the countertop as you install it. If you notice any dips or high spots, adjust the shims or clips accordingly. Taking the time to ensure a level surface will pay off in the long run.
2. Cutting Around Obstacles
Cutting the countertop to fit around sinks, cabinets, and other kitchen features can be tricky. Precision is key to avoid a bulky or uneven fit.
If you’re not confident in your cutting skills, consider hiring a professional to make the cuts. Alternatively, use a wet saw for granite or quartz, and a utility knife for composite materials. Practice on a scrap piece of material first to get a feel for the cutting process.
3. Dealing with Adhesive Residue
When gluing countertops, adhesive residue can sometimes be a problem. It’s important to clean this off before the adhesive fully cures to avoid staining the countertop.
Use a degreasing cleaner and a stiff-bristled brush to remove any adhesive residue. For stubborn spots, a little elbow grease might be needed. Once the surface is clean, you can proceed with the installation.
4. Edge Finishing
Finishing the edges of the countertop is often overlooked but is crucial for both aesthetics and functionality. Edges that aren’t finished properly can look unpolished and may not hold up well over time.
Use an edge bead or edge tape to cover the raw edges and protect them from chipping and staining. This simple step can make a significant difference in the overall appearance and durability of your new countertop.
Conclusion
Kitchen countertop replacement, while intricate, is a rewarding project that can transform the look and feel of your kitchen. By understanding the installation process and being prepared for common challenges, you can ensure a successful and professional finish. From removing the old countertop and preparing the surface to making precise cuts and securing the new material, each step is crucial to achieving the desired outcome.
Installation and Final Touches
${part2}
5. Caulking and Sealing
After the countertop is securely in place, the next step involves caulking and sealing. This step is essential to ensure a watertight seal around the edges of the countertop where it meets the cabinet and sink. Use a high-quality, flexible silicone caulk for this purpose.
Apply the caulk using a caulk gun, smoothing it out with a damp finger to ensure a tight seal. Be careful to avoid over-application, which can cause the caulk to bulge out. Allow the caulk to cure as per the manufacturer’s instructions before using the sink or cabinets.
6. Installing Faucet and Hardware
If your new countertop includes new faucets or hardware, this is the time to install them. Begin by turning off the water supply and disconnecting any old pipes. Install the new faucet according to the manufacturer’s instructions, ensuring all connections are tight and secure.
Reconnect the water supply and check for leaks. It’s important to ensure that all faucets and hardware are functioning correctly before using them. Test each faucet and any other plumbing fixtures to confirm everything is working as it should.
7. Cleaning and Polishing
Once the installation is complete and everything is functioning properly, it’s time to clean and polish your new countertop. For natural stone materials like granite and marble, you’ll need to use a specialized cleaner and polish to protect the surface and enhance its appearance.
For quartz and composite materials, follow the manufacturer’s recommendations for cleaning and maintenance. Generally, avoid using harsh chemicals that can damage the surface. Use a soft cloth and a gentle cleaner to keep your countertop looking its best.
8. Final Inspection and Adjustments
Before you consider the project complete, conduct a final inspection. Check for any missed spots, loose hardware, or areas that may need additional sealing. Pay special attention to the edges and corners where the countertop meets other surfaces.
Make any necessary adjustments or touch-ups. This might include re-caulking, tightening any loose screws, or buffing out any small imperfections. Taking the time to ensure everything is perfect will give you peace of mind and a professional finish.
Troubleshooting Common Issues
1. Sink and Faucet Integration
One of the most common challenges is integrating the new countertop with existing sinks and faucets. If the sink or faucet is too large for the cutout, you may need to adjust the dimensions or consider a different fixture.
If the sink or faucet is too small, you can use a sink base or extension to create a proper fit. Alternatively, you might need to make custom cuts to the countertop to accommodate the existing fixtures.
2. Adhesive Failure
In some cases, adhesive used to secure the countertop may fail, especially if the surface wasn’t properly prepared. If you notice the countertop starting to lift, act quickly to re-secure it.
Apply a new layer of adhesive to the back of the countertop and press it firmly into place. Use shims to hold it in place while the adhesive cures. Ensure the surface is level and smooth before applying the adhesive.
3. Water Leaks
If you notice water leaks after installation, check the caulk around the edges and under the countertop. Re-caulk any areas that may not have been sealed properly. Ensure all plumbing connections are tight and check for any gaps in the adhesive.
4. Surface Damage
During installation, it’s easy to scratch or chip the countertop surface. If you notice any damage, take immediate action to repair it. For natural stone, use a specialized repair kit to fill in any chips or scratches. For quartz or composite materials, follow the manufacturer’s instructions for minor repairs.
Conclusion
Kitchen countertop replacement can indeed seem like a daunting task, but with careful planning, execution, and attention to detail, it can be a rewarding and successful project. By understanding the installation process, being prepared for common challenges, and following the tips provided, you can ensure a beautiful and functional new countertop that enhances your kitchen.
Whether you choose to tackle the project yourself or hire a professional, the key is to approach it methodically and with a positive attitude. With the right tools, techniques, and a bit of patience, you’ll enjoy the benefits of a stunning new kitchen countertop for years to come.